Overview
Working with artists is fun. But, along with the standard design constraints (better, cheaper, faster – pick only two!), aesthetic sensibilities need to be considered.
An installation by Mary Sherman and Florian Grond, for instance, required a connection between the main sculptural structure and 6 separate speakers. Wireless seemed the best route to go in terms of the piece’s formal considerations, trouble-shooting and installing of the work (at The Trondheim Academy of Fine Art, Norwegian University of Science and Technology – a bit far for debugging!).
Many options for the wireless transmission of data were considered – Bluetooth, Wi-Fi, simple RF transmitter/receiver pairs and XBee. In this case, it was decided to use XBee (Series 1) radios, since they have the capability of passing inputs and outputs without any additional hardware, and can easily interface with the Arduino, which was also used in the project. They also have the advantage of being quite small, an important requirement for this project (and, unlike simple RF transmitter pairs – which although cheap – would run the horrible risk of also inadvertently being able to trigger someone’s garage door opening, or a random remote control affecting the installation).
The Technical Issue
The piece involves sending commands between two rooms to multiple sound boards in a synchronized fashion (depending on how Florian wanted the sounds to behave). Delays of even tens of milliseconds weren’t acceptable. (A 50 millisecond delay in sending signals – with the speed of sound at 340 m/sec – translates to about 17 meters of distance [every millisecond translating to 0.34 m], which could cause that ‘stadium echo effect’.) AP-16+ boards were being used to play the sounds. Their advantage is that they have a good quality built in amplifier, can play up to 8 separate sounds, and have easily configurable controls.
As a result of this timing requirement, you can’t use the standard Arduino ‘digitalWrite’ commands, but must use the lower level ‘PORTn’ commands to send commands simultaneously to the Arduino outputs (this is seen in the test code below).
Test Setup
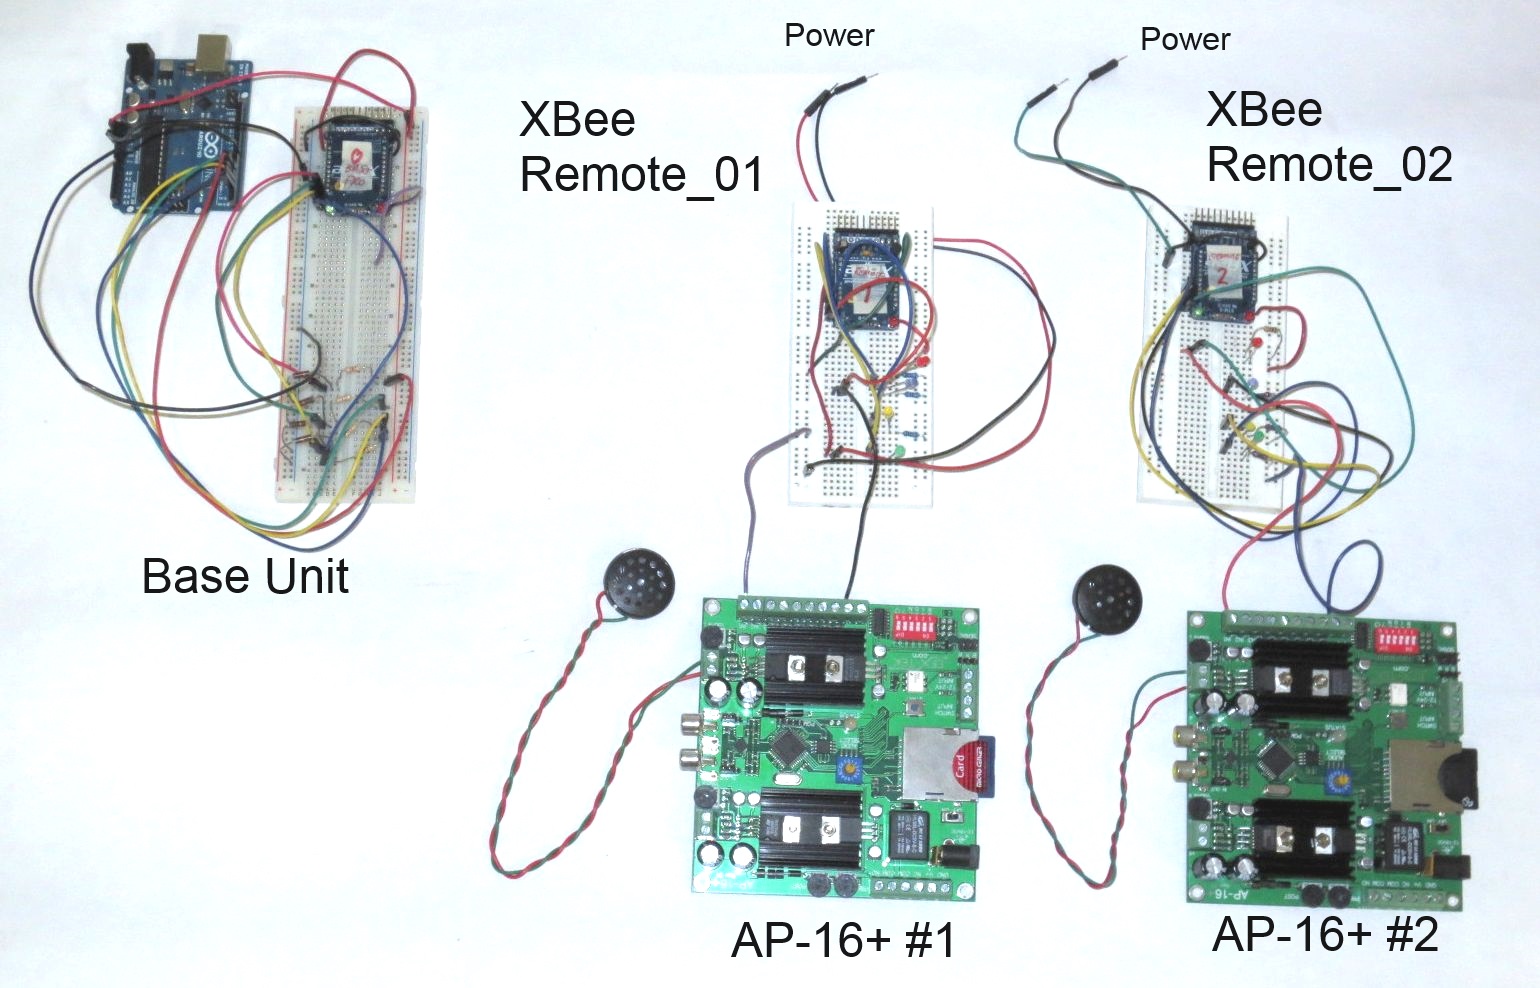
Although the final installation will use 6 speakers (and 3 XBee/AP-16+ sound card combinations), a simpler setup with only 2 XBee/AP-16+ units was tested.
The test setup for this is shown below; a single Base unit, and two Remote units (Remote_1 and Remote_2). The LEDs on the breadboards were used to determine if the bits were going on and off on the remote XBee units; the resistor dividers on the Base unit breadboard were used to create 3.3 V signals for the XBee (it can’t handle 5V).
Results
Synchronicity
The first step was to see how well the system could be synchronized. If there is one Base unit, which talks to *two* remote units simultaneously (in a ‘broadcast’ mode), and you simply send 4 bits (just on/off) continually (at a rate of 10 or 20 Hz, so we can see them blink), the bits tend to sync within about 150 microseconds (0.15 ms):
- BASE UNIT: transmits 4 bits, via XBee inputs 0, 1, 2, 3; on and off (at a frequency of 10 Hz, for this test)
- REMOTE_1: receives those bits via XBee outputs
- REMOTE_2: receives those *same* bits via XBee outputs
In the code, Arduino outputs 2 through 5 are used, which are hooked up to the XBee Base unit inputs 0 to 3. Output bits 0 and 1 on REMOTE_01 would be connected to one sound card, and output bits 2 and 3 to REMOTE_02 and another sound card. So, if you want to play four sounds at the EXACT same time via Arduino outputs 2 through 5, you have to issue an Arduino command like:
// turn on ALL ports:
// port 76543210
PORTD = B00111100;
In theory, we could use only two bits to drive all sound boards, but we want the capability of addressing the cards individually. There may be situations where the artist wants all the boards to play sound simultaneously, and some where only one board is being used, so each channel gets its own control bit. This sort of situation crops up many times in traditional automation projects; sometimes, a client isn’t quite sure of what they want or need (as things are flexible in development environments), but a small bit of effort gives a lot more flexibility.
Intra-XBee
In looking at ONE remote XBee, and send the above command, the difference between each bit is about 50 us (0.05 ms). Using an oscilloscope, you see (within ONE XBee):
- bit 0 turns on at time 0
- bit 1 turns on at time 50 us
- bit 2 turns on at time 100 us
- bit 3 turns on at time 150 us
Inter-XBee
Again, using an oscilloscope, you can see (*between* the two remote XBee units):
- bit 0 on REMOTE_01 turns on at time ‘0’
- bit 0 on REMOTE_02 turns on at time 200 us
Perfectly acceptable for this project; 200 us translates to 0.068 meters, or about 2.6 inches, not a problem. With three units, the delay from the first bit on one remote XBee to the last bit on the last remote will be under 1 ms.
Range
One problem came up after doing the benchtop test – once you start moving the remote units away, they seemed to start dropping the signal (after 10-20 feet or so). Replacing the base XBee with a more powerful XBee Pro unit solved the problem, and the range got much better. The XBee Pro is capable of 60 mW output, but this must be limited to 10 mW in Europe. Since the system is only sending signals in one direction (broadcasting from the base unit to the remotes), only one XBee Pro is required.
Code
The code for the Arduino which drives the XBee base unit (for testing) is here:
In this example, we simply turn the Arduino bits on and off, and can see them via the LEDs on the output of the remote XBee units.
Configurations
The XBee configurations for testing the base and the remote units are as follows; these are the files used by the Digi XCTU program (these are .txt files; they need to be .xml for the program):
- Base Unit xbee_base_profile_10ed
- Remote 1 xbee_remote_01_profile_10ed
- Remote 2 xbee_remote_02_profile_10ed
Again, the base unit can be either the standard XBee (maximum transmitter power 1 mW) or the XBee Pro (maximum transmitter power is 60 mW; in Europe, we need to keep this to 10 mW, however); the configuration files for the Pro versions are here:
- Base Unit (XBee Pro, 60 mW power output) base_pro_profile_10ed
- Base Unit (XBee Pro, 10 mW power output) base_pro_low_power_profile_10ed
Production settings will have different values, of course, for security; this means changing the channel (ID) and the addresses of the base and remote units.
References
In exploring the XBee world there are a few references which have really helped out:
There are a few other use cases that can exist between an XBee/Arduino/computer. These were investigated as well, and the code and configuration files will be discussed in a future article.
Parts
Besides the basic Arduino UNO and the AP-16+ units, the basic and Pro XBee units were purchased from Sparkfun, although they are available in many places. The XBee breakout boards are from Adafruit.