Overview
The “Thermistorcator” is a simple temperature measuring device, using an Arduino Nano and some basic thermistors (Vishay NTCLE100E3103JB0). It is a four channel temperature measuring device, with a resolution of about 0.1 to 0.2 C, serial output, and an OLED display.
Design
Thermistors, thermocouples, and RTDs can all be used for temperature measurement, and have various pros and cons (Google turns up plenty of articles on this). Thermistors are cheap, and for purposes of measuring temperature in ‘regular’ conditions, they are good enough for basic temperature measurement.
This project originally grew out of the Thermal Flashlight project (which is getting better and better!) that I learned about while taking a class on it at the P.irateship. I wanted to have onboard calibration (the thermal flashlight used a Melexis MLX90614 at its core, but didn’t have a simple contact way to measure temperature) and so part of that project morphed into the Thermistorcator.
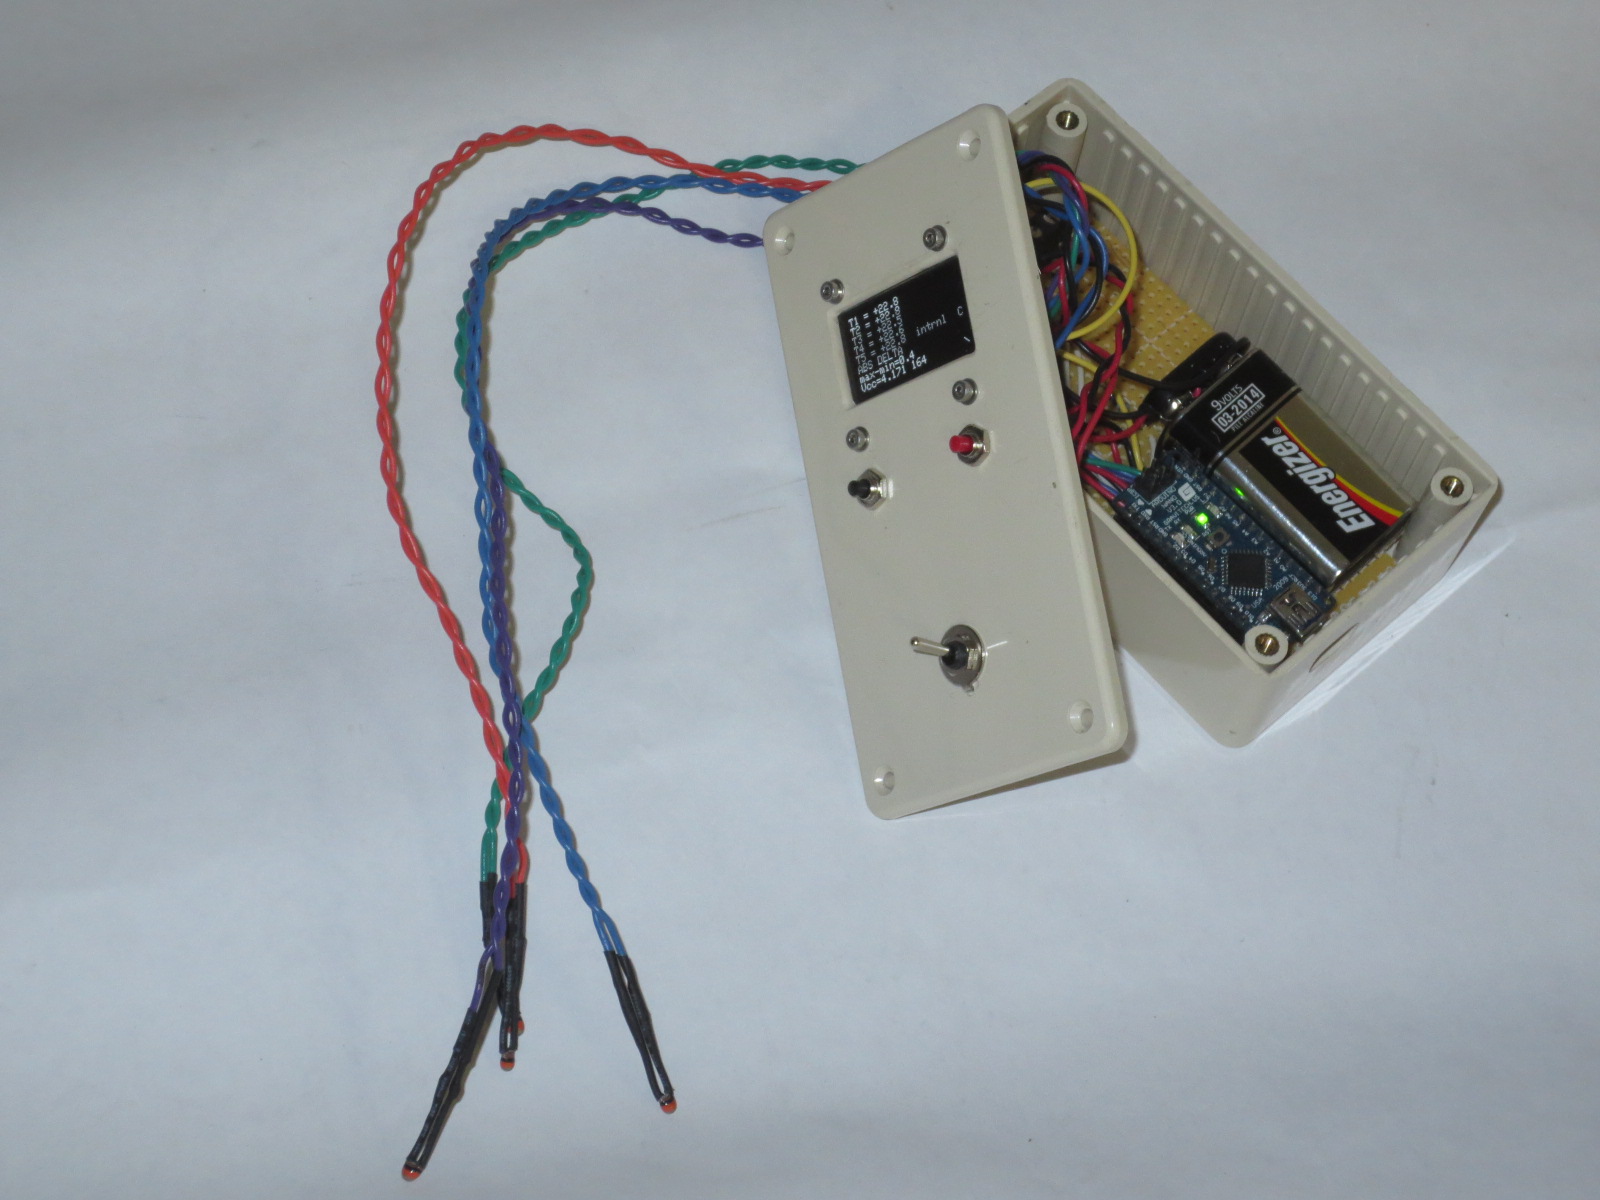
Yes, there are a zillion embedded processors out there, but I figured the Arduino Nano would provide just enough of the simple brains needed to run this project. By using the Arduino, we can reprogram the capability of the system (adding in integration, maximum/minimum, etc. if needed), and also (as a bonus), have serial output from the Arduino go to any computer (Mac, PC, or Linux). Another nice feature is that it is battery powered (using a single 9 V battery), which means it can be used as a hand-held device.
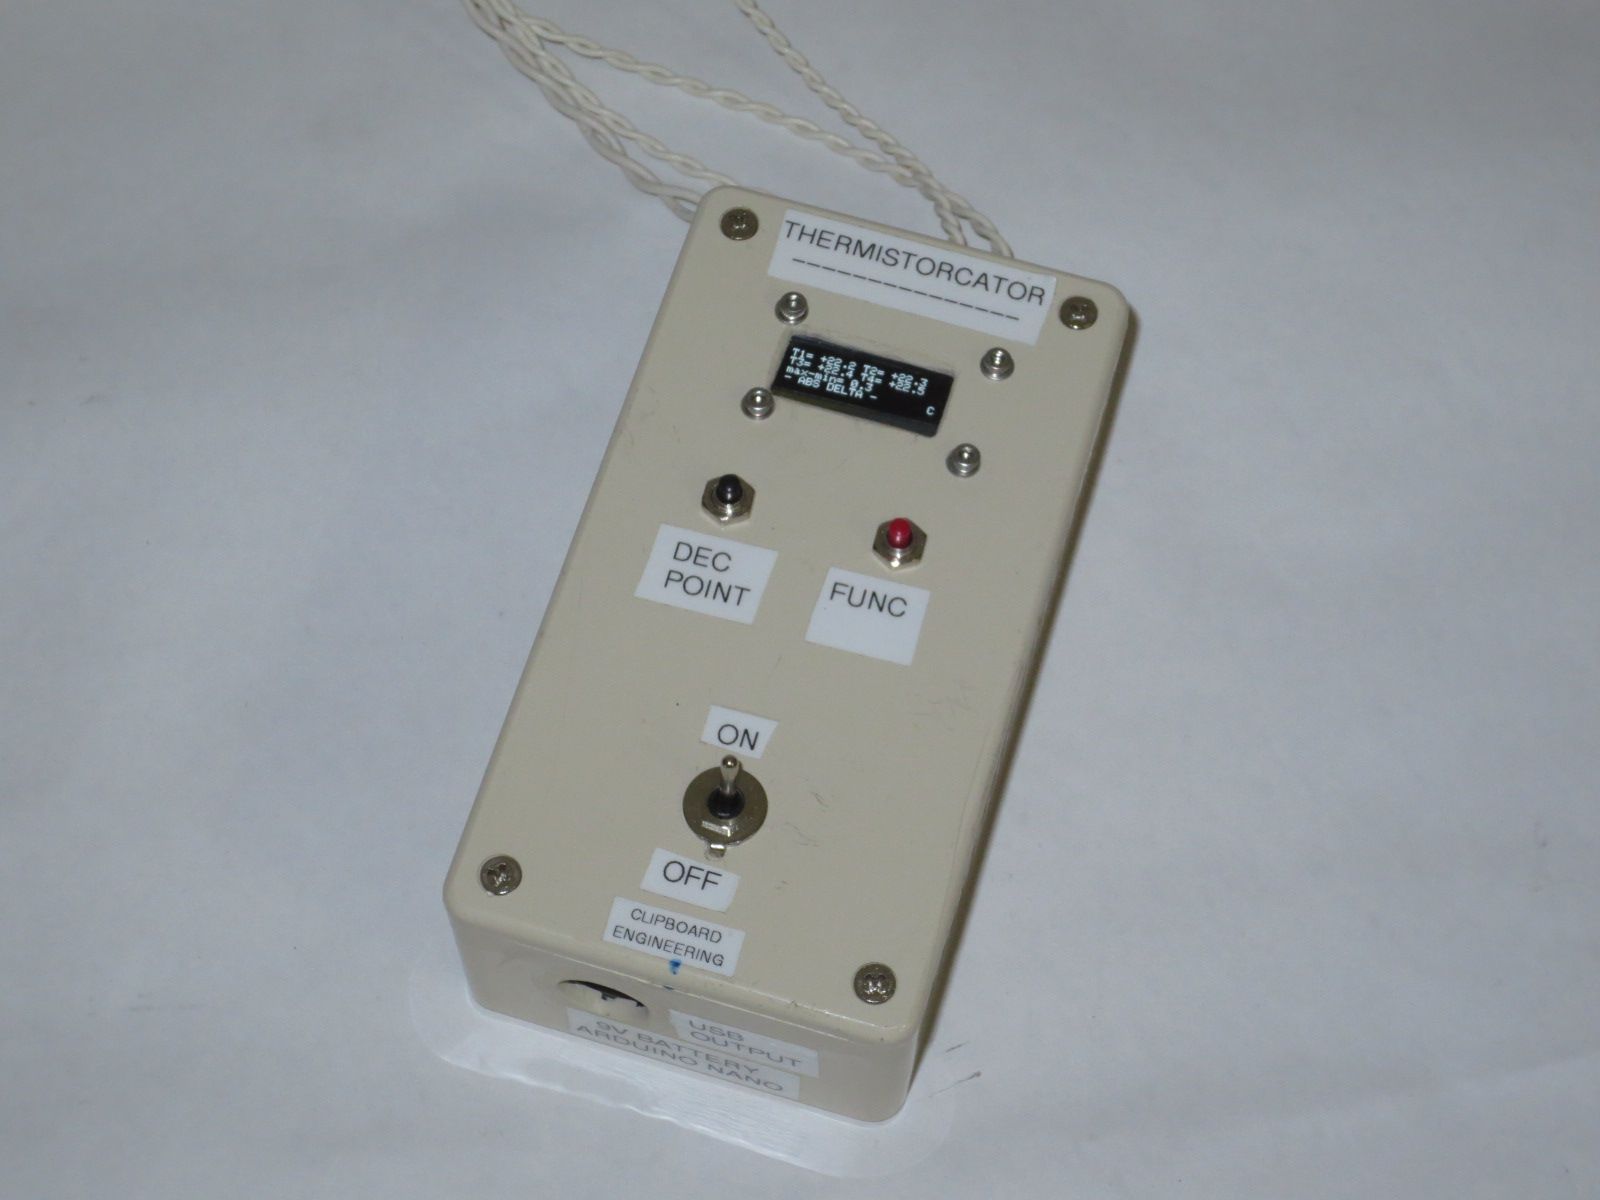
An OLED screen gives a good bit of information, and two buttons are used for input. One (the black button) cycles through the decimal point (0 to 0.0 to 0.00) and then from C to F; the second one (the red button) cycles through various configurations.
Version 1.0
The first version was a proof of concept. It is shown here.
It worked pretty nicely, but the screen was a bit small. The cool thing was that it did work, and worked well on a client’s project!
Version 1.1
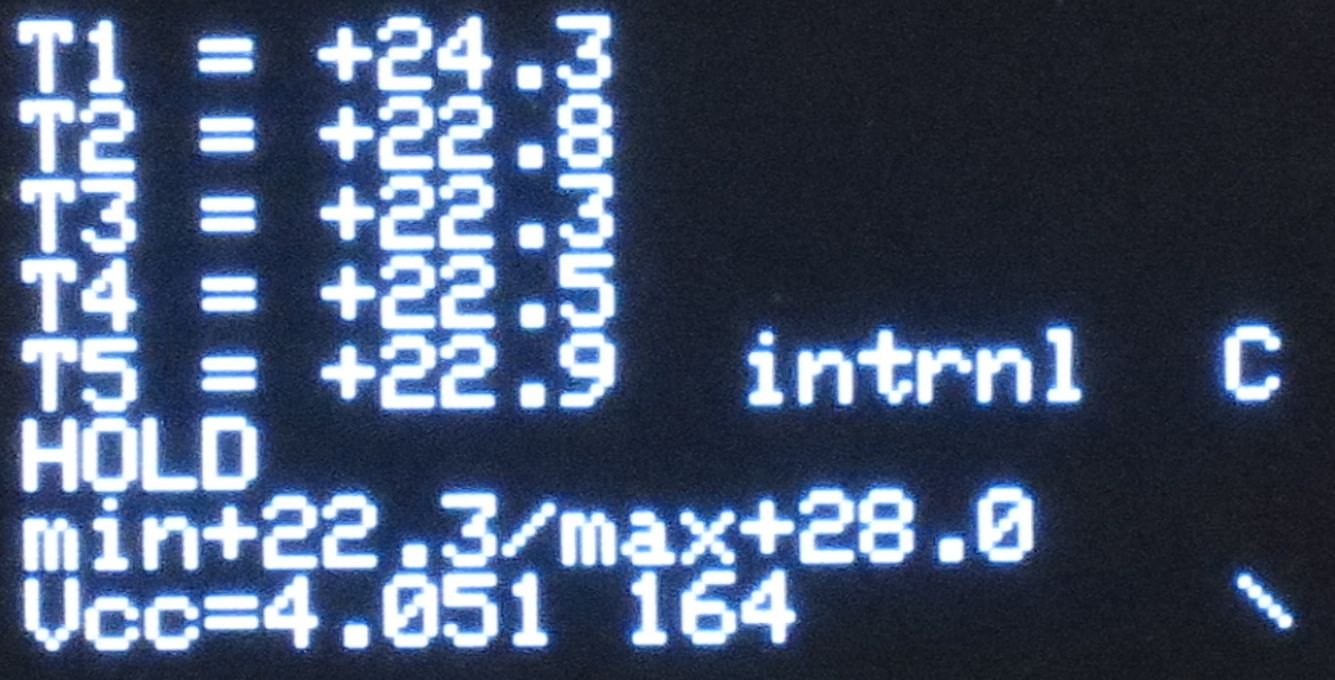
The next version added an internal temperature sensor, as well as a larger OLED screen. With the larger OLED screen, we display all four external temperatures (and the internal sensor) in either C or F, with either 0, 1 or 2 decimal places.
The functions it has are:
- ABS DELTA – the maximum of all temperatures minus the minimum of all temperatures.
- MAX/MIN – the maximum and minimum of all current temperatures.
- HOLD – this shows the maximum and minimum of all temperatures, but holding the maximum and minimum temperatures.
- DIFF FROM SET – this shows the difference from the initial temperature the screen was initialized with; this is good for checking to see how much a system’s temperature drifts.
This version also monitors VCC, and shows how much free memory there is onboard; it also has a small animated cursor so you can make sure that things are still working (it cycles from \ to | to / to – to \ etc. (a bit old school).
Some screen shots show the output as mentioned above:


With a 9V battery, the system pulls about 35 mA. An alkaline 9V battery has about 565 mAh of energy in it, so it won’t last a fantastically long time (various folks have done tests on 9V batteries; I may do some myself), but probably good enough for our purposes. Some further data on 9V batteries is available here, and suggests at least 10 hours of life on battery. When hooked up to a USB port, of course, it is not using the onboard battery for power.
Version 1.2
This version will use a PCB board (from Oshpark); here are some of the boards I got from them. It was a while since I’ve fired up Eagle, so this was a good opportunity to re-evaluate Eagle and see if it is something I want to fold into my professional kit. Another option is gEDA/PCB or KiCad for small boards, that might be the trick.
My first Eagle boards from this project are here:
 Code
Code
Code for version 1.1 (and, for version 1.2) is a single Arduino file; you’ll need a few libraries (noted in the code comments).
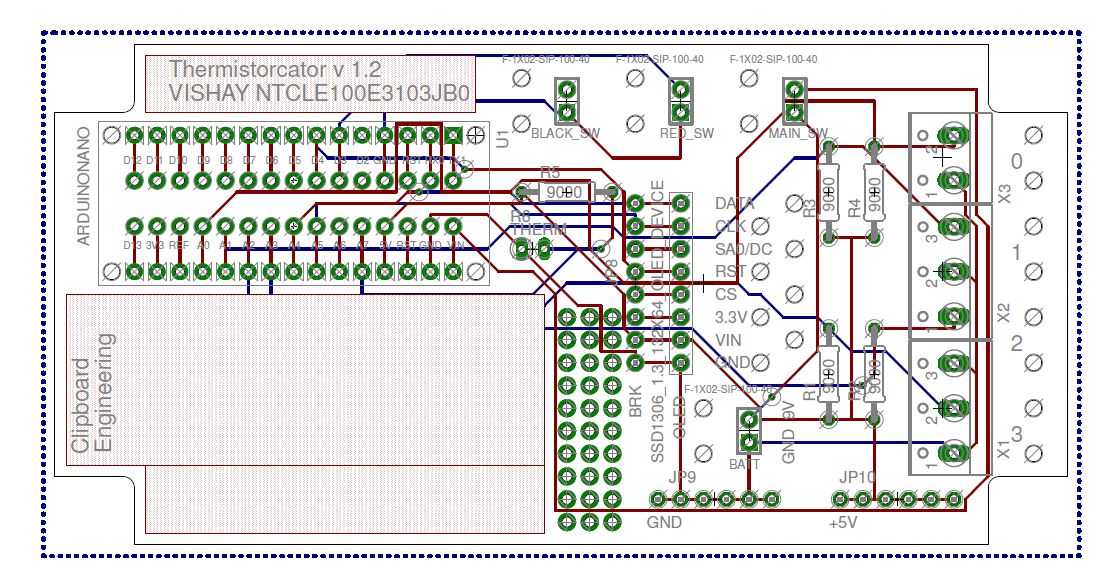
Schematic
The system is pretty simple; an Arduino, a few resistors and thermistors, and a display. A few extra places on the PCB have 5 V and GND; eventually, this might become a test bed for cheap temperature measuring devices I’ve tested, such as the TMP35/36/37 and the DS18B20, which are also kind of neat.
The schematic from Eagle is available here (as a PDF):
Parts
A parts list is available (as a PDF):
thermistorcator_parts_list_20140422
Update – Version 1.2
The updated (version 1.2) Eagle files are available here.
The schematic and PCB layout are shown here; it’s pretty simple, but it’s a neat and clean setup, with room for updates, if necessary (hence the additional mini-PCB prototyping board added near the battery):